I don't have any photos of sledding (sorry), mainly because I didn't want to kill the camera and also because we were sledding in the dark. I am so jealous of people who grew up in the snow. Sledding is ridiculously fun, even if you do end up soaked to the bone and freezing. Even if you do plough face first into snow drifts and end up upside-down. Even if you start facing forwards and end up sliding down the hill backwards with no knowledge of whether you are going to hit a jump or not. Even if you do collide with other people sledding on the same hill. Can't comment on the funness of sledding after hitting a tree however. I managed to avoid that one.
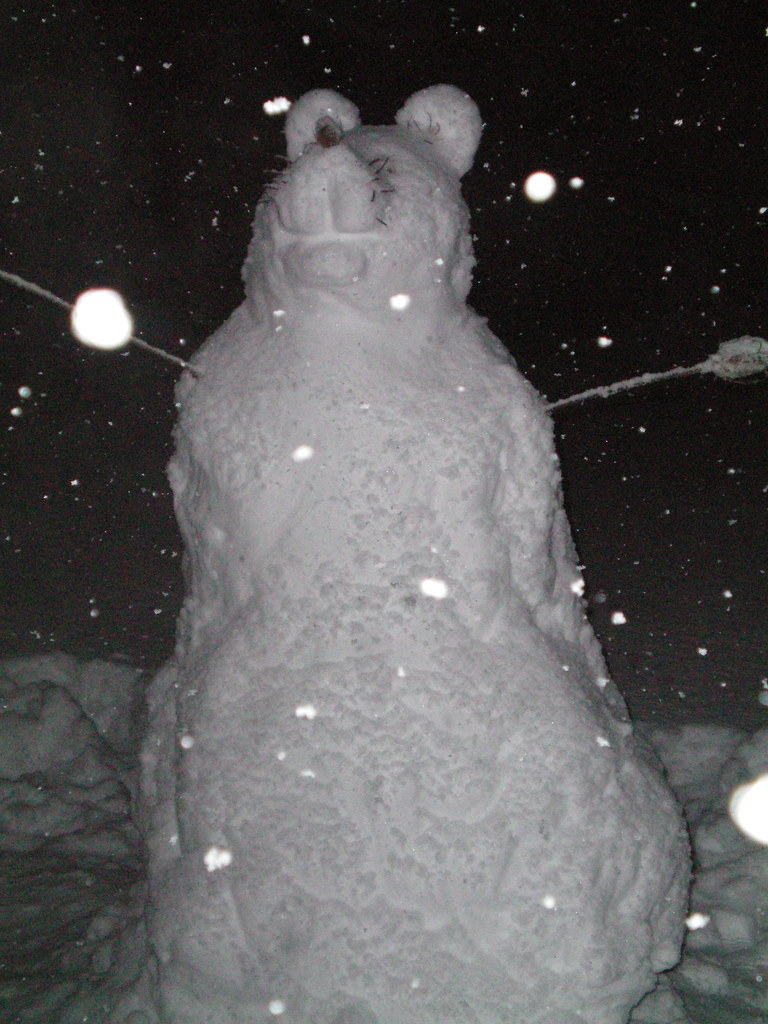
After we got tired of walking back up the hill we made a snowman. Well, we started to make a snowman but it turned into a rather self-conscious snowbear. You know how in the cartoons making a snowman consists of rolling a small ball of snow along the ground as it picks up more and more snow until it becomes a perfect sphere of snow? Well, that is false. TV lies people. Snowmen actually get made like this.
Snowman 101
1. First you grab a handful of snow and squish into a ball-esque shape. Then you put it on the ground and it immediately sinks out of sight into the snow.
2. After scrounging around for a while you give up on that snowball and make another, larger snowball. You then kneel in the snow and begin to roll the ball along.
3. The snowball does indeed pick up more snow, but it does this in such a fashion that your ball begins to develop angles and becomes rather cubiod in shape.
4. At this point you need to start to pack the snow, otherwise when you try to roll it you will just end up pushing bits of snow off your "ball" and you will not gain any additional snow.
5. Continue rolling (and by rolling I mean push the "ball" over on it's angles) and packing your snowball until it becomes too heavy to push any further. Be careful here as overenthusiastic pushing can lead to accidental destruction of the snowball as you put your arm through it by mistake.
6. Now you have a choice, you can either admit defeat and base the size of your snowman on the size of this ball, or you can call for help and continue along with the added strength from your friends.
7. Once your snowball has reached an appropriate size you can now attempt to reshape the cubiod into a ball shape. This can be done by packing the snow, or by adding extra snow to certain places.
8. Repeat steps 1 - 7 to make a torso and head for your snowman. Friends can be utilised here save time, and seriously, who makes a snowman by themselves anyway?
9. Once you have three hopefully semi-spherical snow balls of decreasing size you now face the task of putting them on top of one another. Friends are useful here as well.
There are two common methods of snowman assembly: the Lift and the Roll.
The Lift is relatively simple, however it may require a bit more strength than the Roll:
1. Lift the torso of the snowman onto the base.
2. Lift the head of the snowman onto the torso.
The Roll is a bit more difficult, especially if you are making a large snowman:
1. Roll the torso of the snowman up the side of the base until it rests on top.
2. Roll the head of the snowman up the side of the base and the torso until it rests on top.
10. Now that your snowman is assembled you should pack some extra snow into the joins to prevent the head/torso from rolling off.
11. If you like you can also take this time as an opportunity to reshape your snowman. You can make him look like a traditional snowman with three spherical segments, or you can add or remove snow to give him a more radical shape. Snow can also be used to add extra appendages, ears for example, or a tail. Sticks are often utilised as arms for snowmen, however, depending on your location they may be hard to find.
12. Once you are happy with the overall shape of your snowman it is time to add accessories. Traditional accessories are a top hat, a scarf, a carrot nose, coal eyes and a pipe. A straw broom can also be added for extra effect. Quite often these type of accessories are difficult to come by so you may need to improvise.
13. You should now have a fine looking snowman to call your own. If you are so inclined it is possible to pour water on the snowman to induce shininess and to help the snowman last longer before melting.
Happy building!
P.S. All the photos of the snowbear can be seen here, on the book of faces.
excellent - I can use this description as the basis for a unit of competency! Now I wonder which training package it should go in?? Animal Care?? Landscaping?? Public Safety?? Seafood :)
ReplyDeleteMum
awesome, so glad you posted again, i always look forward to reading your posts. that is a pretty kick ass snow bear
ReplyDeleteThanks Irene! I don't really do much that is worthy of writing about. Most days are filled with class and homework. And occasionally I go to the pub.
ReplyDelete